Publishing ASP.NET Core in IIS

With ASP.NET Core, we can develop applications that runs cross-platform. We have choices whether to use the full .NET framework (4.5.2 or greater) or .NET Core, where .NET Core works cross platform. Comparatively with ASP.NET 4, ASP.NET Core framework is more powerful, modular and fast and provide different options for hosting ASP.NET Core application.

ASP.NET Core comes with two servers that hooks up the port to listen for requests.

WebListener: Only for Windows

Kestrel (recommended) : For Windows, MAC and Linux

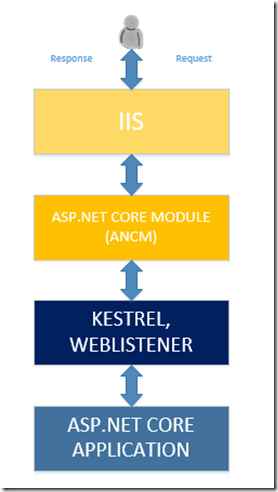
Both Kestrel and WebListener servers are a very light weight servers with a very basic feature set. With production, we usually want other capabilities like load balancing, HTTP modules, request filtering, etc. Therefore, we have to pair Kestrel with any mature or powerful server like IIS or Apache that can act as a reverse proxy, listen for incoming request and pass it to kestrel to process. image
Configure IIS to Publish ASP.NET Core Apps

We will start first by setting up IIS to run ASP.NET Core app. First of all ensure that the IIS is installed on your OS. You can install IIS from windows features under program and features option.

Once the IIS is installed, we have to install the .NET Core hosting bundle that installs the .NET Core runtime, .NET Core library and the ASP.NET Core Module (ANCM). The job of ANCM is to create a reverse proxy between IIS and Kestrel. Restart is recommended after installing these components.

Create Website and Configure App Pool in IIS

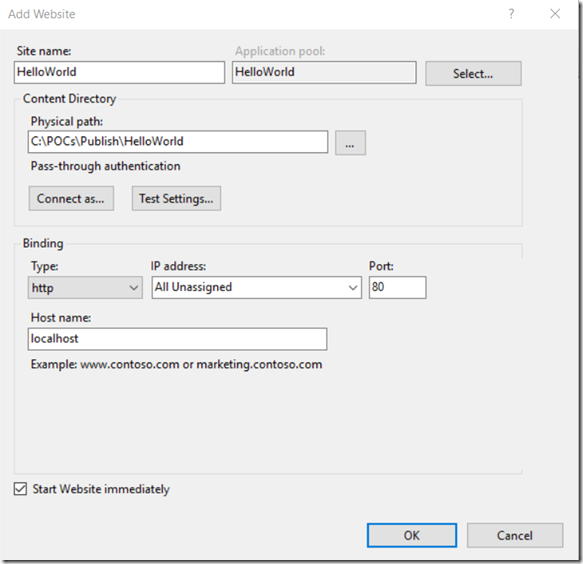
To create an application, open IIS and create a new website as shown below.

image


Once the website is created, go to Application Pool and select No Managed Code for HelloWorld application as shown below.

image

This is important, because for ASP.NET Core apps we don’t want IIS to process the request.

Adding Data Protection

ASP.NET Core uses Data Protection API to encrypt and store keys that are used for authentication. When hosting your application with IIS, we need to run power shell script that creates a registry hive where all the application level keys are stored.

to create our Application registry hive, we will first go to https://raw.githubusercontent.com/aspnet/DataProtection/dev/Provision-AutoGenKeys.ps1 and download it to some local repository. Then open Power shell in Administrative mode and run following command to get the remotesigned policy to run the .ps1 file downloaded above.

powershell –ExecutionPolicy RemoteSigned

Next, we point it to .ps1 file and specify our Application Name (HelloWorld) as shown below.

image

Adding IIS Integration Package in ASP.NET Core and Publish

To run ASP.NET Core application on IIS we have to add a Nuget Package known as Microsoft.AspNetCore.Server.IISIntegration.Tools and make an entry in the program.cs to use IIS integration by calling UseIISIntegration method.

Here is the screen shot of the NuGet package needed to be installed.

image

And here is the updated program.cs of our HelloWorld application

image

UseIISIntegration method actually tells your ASP.NET Core that IIS will be the reverse proxy for the incoming requests. It doesn’t replace Kestrel but allow IIS and ASP.NET Core to setup ports and read other environment variables.

Once this is done, publish your application. Publishing can be done either through Visual Studio or through a Dotnet CLI (dotnet publish). When publishing, choose a destination to the path which is configured in IIS for your application so you don’t have to copy the package files again.

Running your application

Navigate to localhost (hostname as configured above while creating a website) and you will see the default ASP.NET Core home page as shown below.

image

Hope this helps!

My book on JavaScript for .NET Developers

I am pleased to inform you that my book on “JavaScript for .NET developers has been published by Packt Publishing. It was a very good experience but of course it took lot of time from me.

image

This book is a mastering series and targeted primarily to .NET Developers but other non .NET developers can also leverage with the knowledge I shared in this book and understand the concepts and use them with any web application platform. I have tried to accommodate all the information that will be required to master JavaScript.

This book has 10 chapters, starting from the basics to advanced concepts, learning superset of JavaScript i.e. TypeScript and discusses what superset is and how to use TypeScript with Angular 2 and ASP.NET Core. One chapter on WinJS, a JavaScript library that is widely used by UWP developers to bring rich look and feel and other windows runtime features to web applications. Chapter on Node.js that shows how JavaScript can be used on server side and how to develop Node.js applications using Visual Studio 2015. Then covered all about design patterns and shown the usage of around dozen of design patterns to handle particular problem or scenario. Finally, there are the chapters of using JavaScript for large scale projects and how to test and debug JavaScript.

To order either an e-book or a printed copy, It is available on Packt Publishing website i.e. https://www.packtpub.com/application-development/javascript-net-developers and Amazon at https://www.amazon.com/JavaScript-Developers-Ovais-Mehboob-Ahmed-ebook/dp/B01E7GP8I6

Enjoy reading!!

Using WCF SOAP Services in ASP.NET Core

When working with an ASP.NET Core application in Visual Studio 2015, there is no out of the box support to add WCF service references. To add services references of WCF services, Microsoft introduced the WCF Connected services preview to generate the SOAP service references for applications that are using .NET Core.

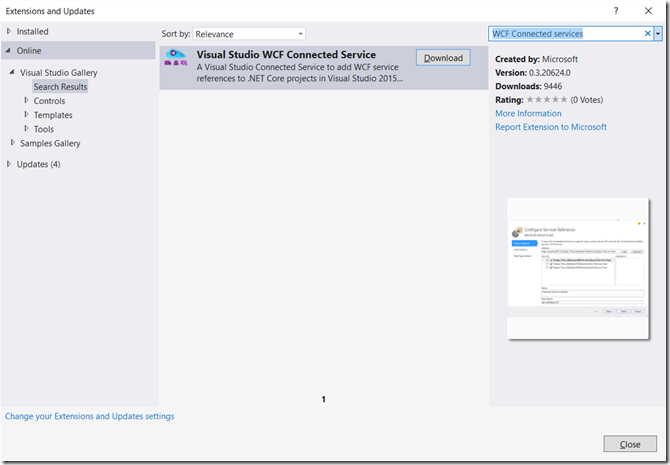
To install WCF Connected Services tool extension we need to have Visual Studio 2015 installed. And then it can be installed from the Visual Studio Extensions and Updates dialog as shown below. This dialog can be opened from Tools > Extensions and Updates option. Search for WCF Connected Services and download. This tool requires to have Visual Studio Update 3 plus the ASP.NET and Web Tools for Visual Studio 2015 extension installed as well.

  image

After installing WCF Connected Services, It asks you to restart Visual Studio and then you can add service reference by right clicking the references node and click on Add Connected Service option

image

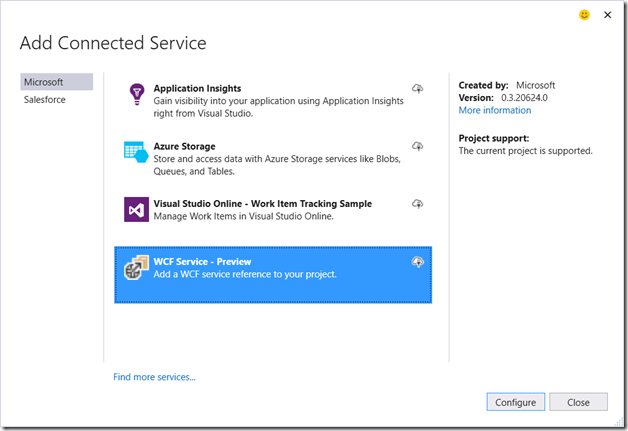
Add Connected Service option will open up the dialog where you can choose  WCF Service – Preview as shown below

image

And finally, you can specify the service URL and add WCF Soap Service reference in your project that creates a proxy and you can use that proxy object to invoke WCF service methods.

Hope this helps!

Transaction Per Request using AutoFac in WebAPI

When working with business applications, transactions plays an important role and providing atomic transactions is a good practice to commit or rollback transaction on either condition. In this post we will implement the Transaction per request in Web API controllers using AutoFac and action filters. Transaction per request is a recommended approach when designing your Web API as it provides the Database object per request and no matter how many transactions you are doing in particular request but provides commit and rollback feature using action filters. We will see how easy it is to handle that using AutoFac dependency injector

Following are the steps you can implement in your Web API project to implement Transaction Per request.

1. FIrst of all add the Autofac for Web API package through NuGet

image

2. Add Entity framework file and connect to some data source. In my case I have ProductEntities and below is the Web API code of Products

public class ProductsController : ApiController
{

ProductsEntities context;

public ProductsController(ProductsEntities entities)
{
context = entities;
}

// GET: api/Products
public IEnumerable<Product> Get()
{
return context.Products.AsEnumerable();
}

// GET: api/Products/5
public Product Get(int id)
{
return context.Products.Where(i => i.ProductID == id).FirstOrDefault();
}

// POST: api/Products
public void Post(Product product)
{
context.Products.Add(product);
context.SaveChanges();

}

// DELETE: api/Products/5
public void Delete(int id)
{
var product = context.Products.Where(i => i.ProductID == id).FirstOrDefault();
if (product != null)
{
context.Products.Remove(product);
context.SaveChanges();
}
}
}


I have defined a pamaterized constructor that takes ProductEntities as a parameter to perform CRUD operation on database

4. Now go to your Startup class and write following code snippet.

using Autofac;
using Autofac.Integration.WebApi;
using System.Reflection;

public void Configuration(IAppBuilder app)
{

        var builder = new ContainerBuilder();
var config = GlobalConfiguration.Configuration;

//Register all Controllers with AutoFac so it will inject ProductEntities by calling
//parameterized constructors
builder.RegisterApiControllers(Assembly.GetExecutingAssembly());
builder.RegisterWebApiFilterProvider(config);

//Initialize ProductEntities per request
builder.RegisterType<ProductsEntities>().InstancePerRequest();

var container = builder.Build();
config.DependencyResolver = new AutofacWebApiDependencyResolver(container);

ConfigureAuth(app);

}

First initialize the dependency container builder object and register API controllers that resides in your project by calling builder.RegisterApiControllers method.  After that I have register the ProductEntities type as InstancePerRequest. This InstancePerRequest will create the new context object per request to preform CRUD operation. Next, build your builder and specify the dependency resolver for your Web API.

5. That’s all set for injecting ProductEntities in Web API Controllers

6. Now in order to handle transactions, we will create a custom ActionFilter class that imlements IAutofacActionFilter interface

It provides two methods OnActionExecuted and OnActionExecuting that you can use to perform begin transactions and commit/rollback transactions.

public class TransactionActionFilter : IAutofacActionFilter
{
public void OnActionExecuted(HttpActionExecutedContext actionExecutedContext)
{
throw new NotImplementedException();
}

public void OnActionExecuting(HttpActionContext actionContext)
{
throw new NotImplementedException();
}
}

But before writing code to begin or commit transactions we have to inject the ProductEntities so create parameterized constructor and pass ProductEntities. So lets add a TransactionActionFilter constructer with having ProductEnttities as a parameter

ProductsEntities context;
public TransactionActionFilter(ProductsEntities entities)
{
context = entities;
}

7. Following is the code to handle transactions on action executed and executing methods

DbContextTransaction currentTransaction;

public void OnActionExecuted(HttpActionExecutedContext actionExecutedContext)
{
if (actionExecutedContext.Exception != null)
currentTransaction.Rollback();
else
currentTransaction.Commit();
}

public void OnActionExecuting(HttpActionContext actionContext)
{
currentTransaction= context.Database.BeginTransaction();
}


8. Finally, register the action filter for Web API controller method to which you want to have transaction applied on. Once the request comes the OnExecuting will be invoked before the actual method call and after it is executed OnExecuted method will be invoked which check if there is any exception and commit or rollback the transaction accordingly.

Register Web API Filter provider

builder.RegisterWebApiFilterProvider(config);

Then add following code to register TransactionActionFilter with your Web API Controller’s method.

builder.Register(c => new TransactionActionFilter(c.Resolve<ProductsEntities>()))
.AsWebApiActionFilterFor<ProductsController>(c => c.Post(default(Product)))
.InstancePerRequest();


builder.Build() should be called after all declaration of container injections.

Hope this helps!

2015 in review

The WordPress.com stats helper prepared a 2015 annual report for this blog.

Here’s an excerpt:

The concert hall at the Sydney Opera House holds 2,700 people. This blog was viewed about 34,000 times in 2015. If it were a concert at Sydney Opera House, it would take about 13 sold-out performances for that many people to see it.

Click here to see the complete report.

Enable CORS in ASP.NET Web API

In modern web applications developers mostly use any client side frameworks like AngularJS, EmberJS, Knockout etc. and in order to make server-side request they either call a Web API or a web service through XMLHttpRequest object and perform CRUD operations.

XHR or XMLHttpRequest in an API available to web browser scripting languages like javascript to send HTTP request to a webserver and load the server response data back in the script. Due to some security reasons these requests are allowed only if both server and the application making that request have same protocol, domain and port values.

So for example if the application URL is http://localhost/WebApplication and it is calling http://localhost:8089/WebService it will fail and give cross-origin request issue.

In internet explorer it ignores the port no. so if both are on localhost or same base address it will call it without any issue. But this does not solve the case. In order to develop a service or a Web Api that has to be accessed by any client we need to handle it properly.

In this post, I will show how simply with few steps we can enable Cross Origin Resource sharing in ASP.NET Web Api.

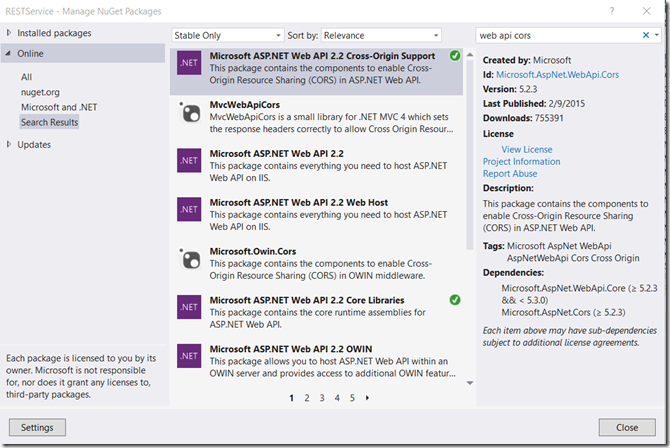
  • First of all in your Web API project add a NuGet Package “Microsoft.AspNet.WebApi.Cors” through NuGet Package Manager

image

  • Then in the WebApiConfig.cs class add an entry to enable cors.

image

  • And finally add the EnableCors attribute on Controller and specify the allowed origins, headers and methods

image

  • You can set origin, header and methods as below.

image

Hope this helps!

Detach EDI node when Source XML element is missing in BizTalk maps

In this post I will share a TIP to detach EDI N2 node segment when the source XML element is missing

Business Scenario:

A BizTalk environment containing some BizTalk maps that  transforms the source XML files into EDI documents. In the scenario we have to generate the EDI 940 document and avoid printing N2 if the source AdditionalName element is missing.

In order to achieve this scenario I have used Logical Existence Functoid that takes input from AdditionalName source element and map to the N2 segment.

1

This will detach the N2 element if AdditionalName is not present in the source document. Additional Name value is actually mapped to N201 segment but in order to avoid N2 populating on EDI document we are good with this.

Next. I have used Logical Existence and Value Mapping functoids for N201 mapping that displays the actual value of Additional Name and avoid throwing exception if the data is not present.

image

Hope this helps!
Debugging code using LINQ and Lambda Expressions in VS 2015

 In this post I will share how easy we can debug LINQ and Lambda expressions in Visual Studio 2015. Sometimes, it is difficult to see larger list in debugging mode. With this feature of VS 2015 we can filter list using LINQ or Lambda expression using Immediate or Watch windows.

Let’s take a quick example of a console application that calls up a method named GetPersons that returns the list of persons.

Below is the class that call GetPersons method which returns a list of 4 persons

1

Now let’s put a break point at the end of Main method

2

You can see that GetPersons() returned the list which you can even see it in the Immediate or Watch windows in earlier versions of Visual Studio as well. But if you want to filter records using some LINQ or Lambda expression, it is not possible in previous versions.

3

Below is the snap shot taken from VS 2013 that shows this error “Expression cannot contain lambda expressions”

4

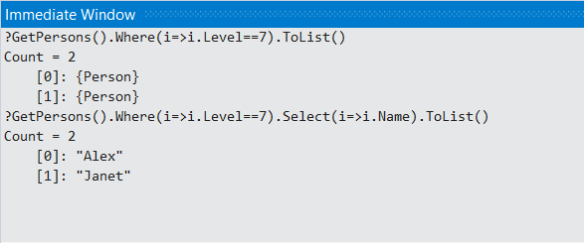
If you run the same expression in Visual Studio 2015. You will see the result like this

5

You can also use Immediate Window to filter records as below

6

Hope this helps!
Diagnosing using IntelliTrace in Visual Studio 2015

One of the exciting and time saving features for diagnosing issues in Visual Studio 2015 is IntelliTrace. This allows to perform historical debugging by recording the events generated by your application. In this post we will see how easy we can enable IntelliTrace in Visual Studio 2015 and perform debugging using Diagnostic tools window.

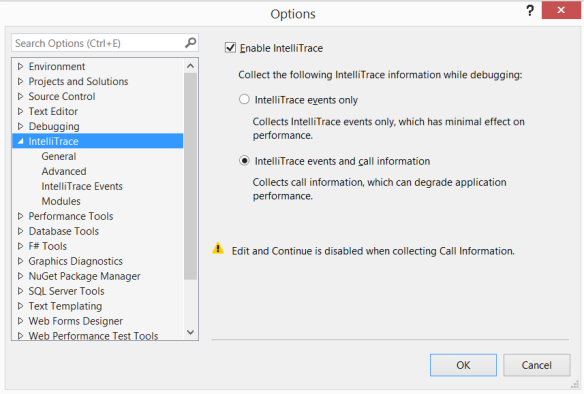
In order to enable IntelliTrace in Visual Studio 2015, go to Tools -> Options and then select IntelliTrace

1

Check the Enable IntelliTrace option and select IntelliTrace events and call information. We should enable with the call information if we need to capture more detailed information like the name of the function, method and the parameters passed and the value returned back. This will however degrade the application performance.

Now click on the IntelliTrace Events to select the events you want to capture.

2

Now once you run the application in Debug mode it will start recording the events and you can see the Diagnostic tool window capturing the information as you use the application. This is very helpful when you don’t need to step into the code and putting break points on different statements rather, you can just enable the IntelliTrace and execute scenarios, and if some error happens, you will have the complete trace through which you can go to any event and through historical debugging exactly check what data has been passed and what happened in the background.

Let’s take a default login page example in which I will try to enter the username and password for two users and then we will step into the historical debugging based on the login events we had raised and see the values passed at each time.

First I entered the following username

3

Then I entered my another email address and got the same invalid login attempt

4

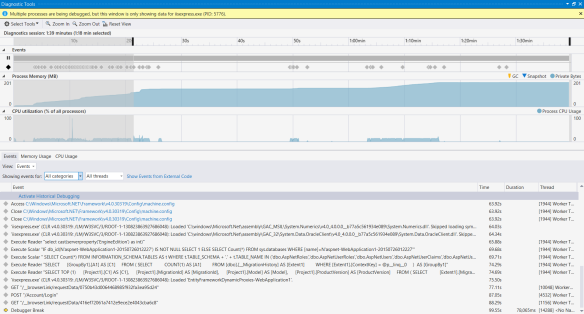
Now, In order to check what happened we don’t need to apply the break points and reproduce the login attempts. However, I will just go to the Diagnostic tool window and check what values were passed and what happened.

IntelliTrace will record continuously until we hit break All from Visual Studio. So first hit break all, then open the Diagnostic Tools Window from Show Diagnostic Tool Window option on Visual Studio or through default shortcut i.e. Ctrl+Alt+F2

5

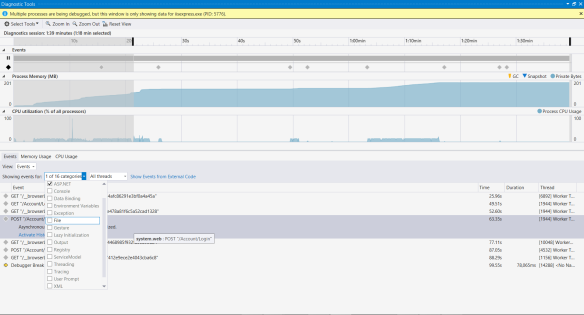
Filter only ASP.NET events from the category

6

Select POST “/Account/Login” and click on Activate Historical Debugging

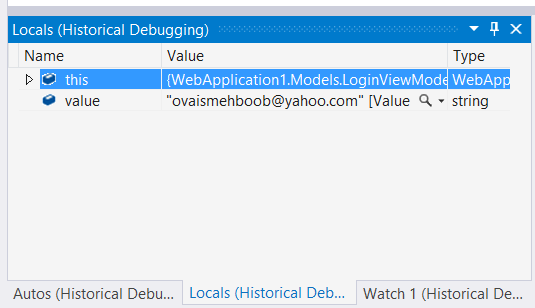
We can step over and go to the Login method and in order to check what data has been passed we can go to the Locals (Historical Debugging) tab

7

8

9

Hope this helps!

Creating ASP.NET 5 Web Application using Yeoman Generator

In this post we will explore Yeoman generator that helps to scaffold ASP.NET 5 web application using command line statements. What is Yeoman? Yeoman is a set of tools that facilitates building web applications. It comprises of three tools

  • yo (scaffolding template tool)
  • task runner/build tool (Grunt, Gulp)
  • package manager (Bower, npm)

In this post I will focus on yo tool that can be used to generate scaffolding template for aspnet web applications. This tool can be used in environments where you don’t have a Visual Studio 2015 installed or you wanted to scaffold web application using yo command. Yeoman generator for ASP.NET 5 emphasizes to continued effort to enable cross-platform development of ASP.NET It is available for Windows, Linux and OSX operating systems. First of all, configure the ASP.NET 5 environment on your machine.

  1. The easiest way to get started on windows is to install Visual Studio 2015. Visual studio 2015 installs the DNVM (Dot NET Version Manager) command line tool to manage DNX (Dot Net Execution environment) versions and much more.
  2. If you don’t want to install Visual Studio 2015 you can even run this Power shell command to install DNVM{$Branch=’dev’;iex ((new-object net.webclient).DownloadString(‘https://raw.githubusercontent.com/aspnet/Home/dev/dnvminstall.ps1&#8217;))}
  3. This command will install the DNVM and the latest DNX version available at NuGet.org.
  4. Now run following command to list the version of DNX installed on your system

C:\dnvm list

1

Once ASP.NET 5 environment is setup, develop a simple ASP.NET 5 web application using Yeoman generator.

  1. First of all install the yeoman generator using this command npm install –g yo generator-aspnet

2

2.  Now run yo aspnet to create ASP.NET 5 web application 3

3. You can select any template using top/down arrow keys

4. Let’s select 3rd template type i.e. Web Application and press Enter

5. It will ask you to specify the name 4

6.Specify any name and press enter 5

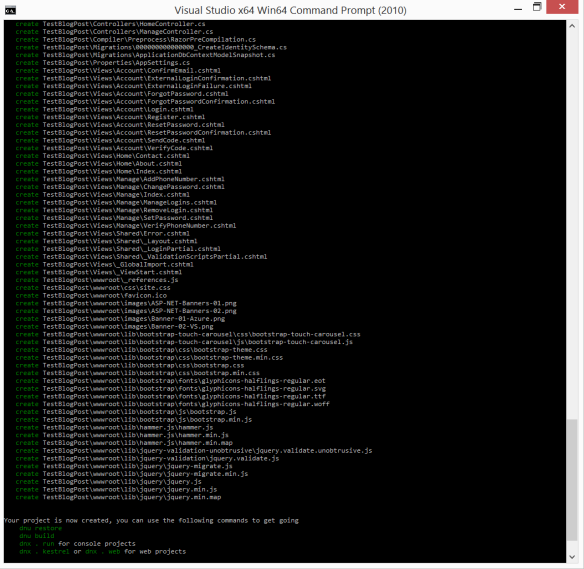
7. You can see the project is created, now go to the folder as I created on root C drive and my web application project   name was TestBlogPost so I found the folder created as TestBlogPost inside c drive root.

8. Now browse your folder and open project.json file, you will see bunch of packages specified there

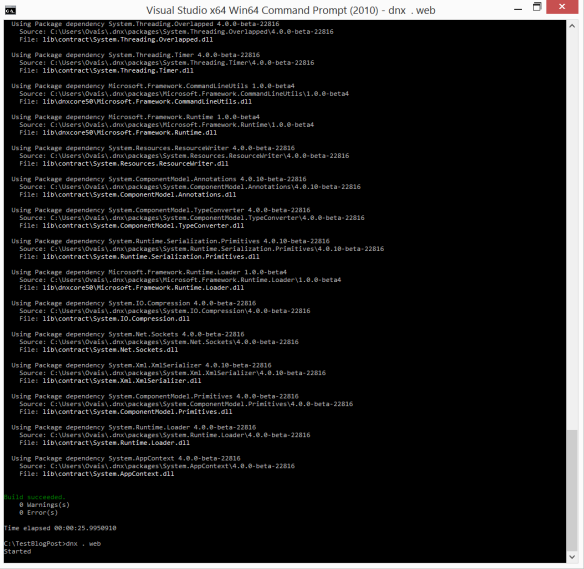
9. Run kpm restore to restore the packages and then kpm build to build the web application 6

10. Run dnx . web finally to run the web server 7

11. Now browse to http://localhost:5000 address, you will see the ASP.NET 5 home page as below. (You can see the URL from project.json configured for web command)

0 Hope this helps!