In this article I will show the way of writing a custom HTML helper in ASP.NET MVC project to generate grid at runtime. Although, there are many JQuery controls and third party controls available that provide grid management functionalities but in certain cases you have to design controls to handle specific logic and conditions.
In one of my project I designed a grid control using TagBuilder that generates a grid at runtime on html page. I used Knockout and Knockout extensions to generate view model from the model associated to the view page. (Please note: in the below code snippets I have used Knockout and followed Knockout syntax for data binding and grid generation. You can learn knockout here)
First of all I created an HTMLExtension class marked as static. In ASP.NET MVC there are some out of the box HTML helpers provided like TextBoxFor, LabelFor etc. In order to generate our own HTML tags that work just like the standard HTML helpers provided in ASP.NET MVC framework we have to meet below conditions
- Class containing the HTML Helper method should be static
- First parameter should be preceded with this HtmlHelper; indicates the HtmlHelper class that the extension method extends
Following is a code snippet of the custom Grid generation Html Helper method
public
static
IHtmlString GridFor<TModel>(this
HtmlHelper<TModel> htmlHelper, String modelView, Type type)
{
TagBuilder controlBuilder = new
TagBuilder(“table”);
controlBuilder.Attributes.Add(“style”, “border:1px;”);
var properties = type.GetProperties();
#region Header
TagBuilder thead = new
TagBuilder(“thead”);
TagBuilder rowHeader = new
TagBuilder(“tr”);
foreach (var property in properties)
{
var attrHeader = property.CustomAttributes.Where(i => i.AttributeType == typeof(Common.Facade.GridColumnAttribute)).ToList();
if (attrHeader.Count != 0)
{
var attributeHeader = attrHeader[0];
if (Convert.ToBoolean(attributeHeader.ConstructorArguments[1].Value) == false)
{
TagBuilder col = new
TagBuilder(“td”);
col.InnerHtml = attributeHeader.ConstructorArguments[0].Value.ToString();
rowHeader.InnerHtml += col.ToString();
}
}
}
thead.InnerHtml += rowHeader.ToString();
controlBuilder.InnerHtml = thead.ToString();
#endregion
#region Rows and Columns
TagBuilder tbody = new
TagBuilder(“tbody”);
tbody.Attributes.Add(“data-bind”, “foreach: “ + modelView);
tbody.Attributes.Add(“style”, “width:100”);
TagBuilder row = new
TagBuilder(“tr”);
foreach (var property in properties)
{
var attr = property.CustomAttributes.Where(i => i.AttributeType == typeof(Common.Facade.GridColumnAttribute)).ToList();
if (attr.Count != 0)
{
var attribute=attr[0];
if (Convert.ToBoolean(attribute.ConstructorArguments[1].Value) == false)
{
TagBuilder col = new
TagBuilder(“td”);
col.Attributes.Add(“data-bind”, “text: “ + property.Name);
row.InnerHtml += col.ToString();
}
}
}
tbody.InnerHtml += row.ToString();
controlBuilder.InnerHtml += tbody.ToString();
#endregion
return
MvcHtmlString.Create(controlBuilder.ToString());
}
On the index.cshtml page I have used Knockout to create view models on the fly
<script
type=”text/javascript”>
ModelService.Persons = @Html.Raw(Json.Encode(ViewBag.Persons));
</script>
ModelService.Persons represents the collection view model of the list shipped in ViewBag
Finally, you can place following line on your html page to render Grid at runtime.
@Html.GridFor(“ModelService.Persons”,typeof(Person))

In order to change the look and feel of the plain grid, you can define styles using css to the table rows and columns.
The above grid HTML helper method generates the column name based on the property name. In order to define custom column names we can define custom attribute and annotate that on each property of the properties Class. Below is a sample code snippet of the custom attribute containing few properties.
[AttributeUsage(AttributeTargets.Property)]
public
class
GridColumnAttribute : Attribute
{
public
string GridColName { set; get; }
public
bool IsHidden { set; get; }
public GridColumnAttribute(String Name, bool isHidden)
{
this.GridColName = Name;
this.IsHidden = isHidden;
}
}
We can annotate this attribute on our Person class like below (Note: Person is our Model class)
public
class
Person
{
[GridColumn(“Id”, true)]
public
int Id { set; get; }
[Required]
[GridColumn(“Name”, false)]
[StringLength(10, ErrorMessage=“Length cannot exceed to 10 character”)]
public
string Name { set; get; }
[GridColumn(“Department”, false)]
public
string Department{set;get;}
public
String EditLink { get { return
“Person/Edit/” + Id; } }
public
String DeleteLink { get { return
“Person/Delete/” + Id; } }
}
In the above code the EditLink and DeleteLink properties are defined to provide row level edit and delete options.
The extended version of the custom Grid HTML Helper method that supports row level editing, deleting and user defined column naming is as follows
public
static
IHtmlString GridFor<TModel>(this
HtmlHelper<TModel> htmlHelper, String modelView, Type type)
{
TagBuilder controlBuilder = new
TagBuilder(“table”);
controlBuilder.Attributes.Add(“style”, “border:1px;”);
var properties = type.GetProperties();
#region Header
TagBuilder thead = new
TagBuilder(“thead”);
TagBuilder rowHeader = new
TagBuilder(“tr”);
foreach (var property in properties)
{
var attrHeader = property.CustomAttributes.Where(i => i.AttributeType == typeof(Common.Facade.GridColumnAttribute)).ToList();
if (attrHeader.Count != 0)
{
var attributeHeader = attrHeader[0];
if (Convert.ToBoolean(attributeHeader.ConstructorArguments[1].Value) == false)
{
TagBuilder col = new
TagBuilder(“td”);
col.InnerHtml = attributeHeader.ConstructorArguments[0].Value.ToString();
rowHeader.InnerHtml += col.ToString();
}
}
}
thead.InnerHtml += rowHeader.ToString();
controlBuilder.InnerHtml = thead.ToString();
#endregion
#region Rows and Columns
TagBuilder tbody = new
TagBuilder(“tbody”);
tbody.Attributes.Add(“data-bind”, “foreach: “ + modelView);
tbody.Attributes.Add(“style”, “width:100”);
TagBuilder row = new
TagBuilder(“tr”);
foreach (var property in properties)
{
var attr = property.CustomAttributes.Where(i => i.AttributeType == typeof(Common.Facade.GridColumnAttribute)).ToList();
if (attr.Count != 0)
{
var attribute = attr[0];
if (Convert.ToBoolean(attribute.ConstructorArguments[1].Value) == false)
{
TagBuilder col = new
TagBuilder(“td”);
col.Attributes.Add(“data-bind”, “text: “ + property.Name);
row.InnerHtml += col.ToString();
}
}
}
TagBuilder editTd = new
TagBuilder(“td”);
TagBuilder editLink = new
TagBuilder(“a”);
editLink.Attributes.Add(“data-bind”, “attr: {href: EditLink}”);
editLink.InnerHtml = “Edit”;
editTd.InnerHtml += editLink.ToString();
row.InnerHtml += editTd.ToString();
TagBuilder deleteTd = new
TagBuilder(“td”);
TagBuilder deleteLink = new
TagBuilder(“a”);
deleteLink.Attributes.Add(“data-bind”, “attr: {href: DeleteLink}”);
deleteLink.InnerHtml = “Delete”;
deleteTd.InnerHtml += deleteLink.ToString();
row.InnerHtml += deleteTd.ToString();
tbody.InnerHtml += row.ToString();
controlBuilder.InnerHtml += tbody.ToString();
#endregion
return
MvcHtmlString.Create(controlBuilder.ToString());
}
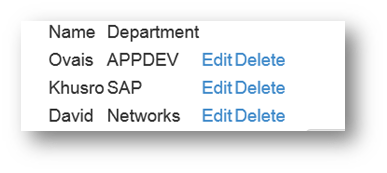
Now when you run the extended version following Grid will be generated.
- Clicking on the edit link will redirect it to the http://<URL>/Person/Edit where Person is the controller and Edit is an Action name
- Same goes with delete link and redirect it to the http://<URL>/Person/Delete
Hope this helps!