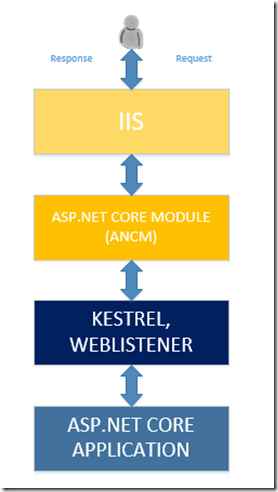
With ASP.NET Core, we can develop applications that runs cross-platform. We have choices whether to use the full .NET framework (4.5.2 or greater) or .NET Core, where .NET Core works cross platform. Comparatively with ASP.NET 4, ASP.NET Core framework is more powerful, modular and fast and provide different options for hosting ASP.NET Core application.
ASP.NET Core comes with two servers that hooks up the port to listen for requests.
WebListener: Only for Windows
Kestrel (recommended) : For Windows, MAC and Linux
Both Kestrel and WebListener servers are a very light weight servers with a very basic feature set. With production, we usually want other capabilities like load balancing, HTTP modules, request filtering, etc. Therefore, we have to pair Kestrel with any mature or powerful server like IIS or Apache that can act as a reverse proxy, listen for incoming request and pass it to kestrel to process. 
Configure IIS to Publish ASP.NET Core Apps
We will start first by setting up IIS to run ASP.NET Core app. First of all ensure that the IIS is installed on your OS. You can install IIS from windows features under program and features option.
Once the IIS is installed, we have to install the .NET Core hosting bundle that installs the .NET Core runtime, .NET Core library and the ASP.NET Core Module (ANCM). The job of ANCM is to create a reverse proxy between IIS and Kestrel. Restart is recommended after installing these components.
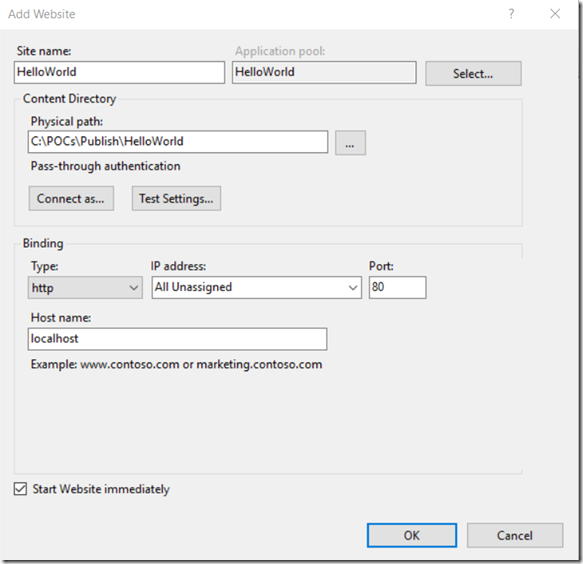
Create Website and Configure App Pool in IIS
To create an application, open IIS and create a new website as shown below.
Once the website is created, go to Application Pool and select No Managed Code for HelloWorld application as shown below.
This is important, because for ASP.NET Core apps we don’t want IIS to process the request.
Adding Data Protection
ASP.NET Core uses Data Protection API to encrypt and store keys that are used for authentication. When hosting your application with IIS, we need to run power shell script that creates a registry hive where all the application level keys are stored.
to create our Application registry hive, we will first go to https://raw.githubusercontent.com/aspnet/DataProtection/dev/Provision-AutoGenKeys.ps1 and download it to some local repository. Then open Power shell in Administrative mode and run following command to get the remotesigned policy to run the .ps1 file downloaded above.
powershell –ExecutionPolicy RemoteSigned
Next, we point it to .ps1 file and specify our Application Name (HelloWorld) as shown below.
Adding IIS Integration Package in ASP.NET Core and Publish
To run ASP.NET Core application on IIS we have to add a Nuget Package known as Microsoft.AspNetCore.Server.IISIntegration.Tools and make an entry in the program.cs to use IIS integration by calling UseIISIntegration method.
Here is the screen shot of the NuGet package needed to be installed.
And here is the updated program.cs of our HelloWorld application
UseIISIntegration method actually tells your ASP.NET Core that IIS will be the reverse proxy for the incoming requests. It doesn’t replace Kestrel but allow IIS and ASP.NET Core to setup ports and read other environment variables.
Once this is done, publish your application. Publishing can be done either through Visual Studio or through a Dotnet CLI (dotnet publish). When publishing, choose a destination to the path which is configured in IIS for your application so you don’t have to copy the package files again.
Running your application
Navigate to localhost (hostname as configured above while creating a website) and you will see the default ASP.NET Core home page as shown below.
Hope this helps!


